Using Pipelines
The following section demonstrates how to trigger and run pipelines as well as to check on the application status.
Deploying an application to OpenShift
Prerequisites
-
You have installed OpenShift Pipelines using the OpenShift Pipeline Operator listed in the OpenShift OperatorHub. Once installed, it is applicable to the entire cluster.
-
You have installed the Tekton CLI
-
You have installed the CodeReady Containers (CRC) - a recommended solution for quick deployment of OpenShift clusters.
Procedure
-
Create a local CRC virtual machine:
$ crc start
If you use a hosted hypervisor, see the CRC documentation. crc startoutput contains user login and password needed for logging into the cluster. -
Add the cached
ocbinary to your PATH:-
Run the crc oc-env command to print the command needed to add the cached oc binary to your PATH:
$ crc oc-env
-
Run the printed command.
-
-
Log into the OpenShift cluster with the provided login and password:
$ oc login -u <login> -p <password> https://api.crc.testing:6443
-
Create a project for the sample application:
$ oc new-project pipelines-tutorial
-
Building container images using build tools such as S2I, Buildah, or Kaniko, require privileged containers to access the cluster. The default security settings in OpenShift do not allow privileged containers. Create a service account for running
Pipelines and enable it to run privileged pods for building container images:$ oc create serviceaccount pipeline $ oc adm policy add-scc-to-user privileged -z pipeline $ oc adm policy add-role-to-user edit -z pipeline
-
Create the Kubernetes objects for deploying the PetClinic application on OpenShift:
$ oc create -f https://raw.githubusercontent.com/openshift/pipelines-tutorial/master/resources/petclinic.yaml
-
Navigate to Home → Projects → Status in the OpenShift Web Console to verify the deployment. The deployment at this stage is not complete. The
Pipelineyou create in the next steps builds the container images for the PetClinic application and completes the deployment.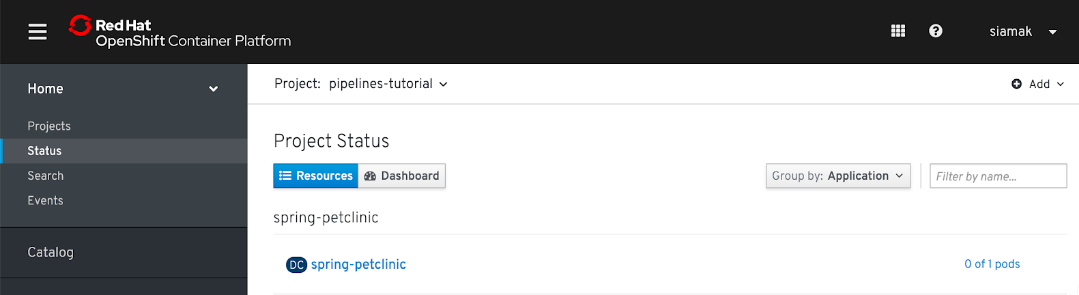
Defining and creating pipeline tasks
Tasks are the building blocks of a Pipeline and consist of sequentially executed steps. steps are a series of commands that achieve a specific goal, for instance, build an image.
Every Task runs as a pod and each step runs in its own container within the same pod. Since they run within the same pod they have access to the same volumes to cache files, configmaps, and secrets. They use inputs parameters, for example, a git , and outputs parameters, for example, an image in a registry, to interact with other tasks.
Tasks are reusable and can be used in multiple Pipeline s. For this tutorial, you create a Maven Task with a single step to build a Maven based application, and then add two reusable Tasks from the catalog repository.
Procedure
-
To create the Maven
Task:-
Copy the contents of the following sample
TaskYAML file and save it:apiVersion: tekton.dev/v1alpha1 kind: Task metadata: name: maven-build spec: inputs: resources: - name: workspace-git targetPath: / type: git steps: - name: build image: maven:3.6.0-jdk-8-slim command: - /usr/bin/mvn args: - installThis
Taskstarts a pod and runs a container inside that pod using themaven:3.6.0-jdk-8-slimimage to run the specified commands. It receives an input directory calledworkspace-gitwhich contains the source code of the application.Only the requirement for a git repository is declared on the
Taskand not a specific git repository to be used. This allowsTasksto be reusable for multiplePipelines and purposes. -
Create the
Taskwithin your project:oc create -f maven-build-task.yaml
-
-
Install the
s2i-javaandopenshift-clientreusableTasksfrom the catalog repository, which contains a list of reusableTasksforPipelines:$ oc create -f https://raw.githubusercontent.com/tektoncd/catalog/master/openshift-client/openshift-client-task.yaml $ oc create -f https://raw.githubusercontent.com/openshift/pipelines-catalog/master/s2i-java8/s2i-java-8-task.yaml
-
Verify the
Tasksadded to thePipelineas follows:$ tkn task ls NAME AGE maven-build 23 secs ago openshift-client 10 secs ago s2i-java 11 secs ago
Additional resources
-
For more examples of reusable
Taskssee the Tekton Catalog and OpenShift Catalog repositories.
Defining and creating pipeline resources
PipelineResources are artifacts that are used as inputs to a Task and can be output by a Task.
Procedure
After you create Task s, create PipelineResources that contain the specifics of the Git repository and the image registry to be used in the Pipeline during execution as follows:
-
Create a
PipelineResourceYAML file with aPipelineResourcethat defines the Git repository and reference for the PetClinic application as follows:apiVersion: tekton.dev/v1alpha1 kind: PipelineResource metadata: name: petclinic-git spec: type: git params: - name: url value: https://github.com/spring-projects/spring-petclinic -
To the above
PipelineResourceYAML file, add anotherPipelineResourcethat defines the OpenShift internal registry to which you want to push the PetClinic image, as shown below, and save it.apiVersion: tekton.dev/v1alpha1 kind: PipelineResource metadata: name: petclinic-image spec: type: image params: - name: url value: image-registry.openshift-image-registry.svc:5000/pipelines-tutorial/spring-petclinic -
Create the above pipeline resources as follows:
$ oc create -f https://raw.githubusercontent.com/openshift/pipelines-tutorial/master/resources/petclinic-resources.yaml
-
Verify the resources created as follows:
$ tkn resource ls

NAME              TYPE    DETAILS
petclinic-git     git     url: https://github.com/spring-projects/spring-petclinic
petclinic-image   image   url: image-registry.openshift-image-registry.svc:5000/pipelines-tutorial/spring-petclinic
Assembling a pipeline
A Pipeline represents a CI/CD flow and is defined by the Tasks to be executed. It specifies how the Tasks interact with each other and their order of execution using the inputs , outputs, and the run-After parameters. It is designed to be generic and reusable in multiple applications and environments.
For this tutorial, we create a Pipeline that takes the source code of the Spring PetClinic application from GitHub, builds the application, and deploys it on OpenShift as outlined below:

Procedure
-
Copy the contents of the following sample
PipelineYAML file and save it:apiVersion: tekton.dev/v1alpha1 kind: Pipeline metadata: name: petclinic-deploy-pipeline spec: resources: - name: app-git type: git - name: app-image type: image tasks: - name: build taskRef: name: s2i-java-8 params: - name: TLSVERIFY value: "false" resources: inputs: - name: source resource: app-git outputs: - name: image resource: app-image - name: deploy taskRef: name: openshift-client runAfter: - build params: - name: ARGS value: "rollout latest spring-petclinic"This
Pipelineperforms the following tasks:-
Clones the source code of the application from a Git repository (app-git resource).
-
Builds the container image using the S2I task which generates a Dockerfile for the application and uses Buildah to build an image.
-
The application image is then pushed to an image registry (app-image resource).
-
The new application image is deployed on OpenShift using the OpenShift-CLI.
Note that, the
PipelineYAML file contains no references to the PetClinic Git repository and its image in the registry. These are defined in thePipelineResources.Pipelines in Tekton are designed to be generic and re-usable across environments and stages through the applications lifecycle. They abstract away the specifics of the Git source repository and image registries to be used duringPipelineexecution.The execution order of the tasks is determined by the dependencies defined between the tasks using the
inputsandoutputsparameters, and the explicit orders that are defined usingrunAfter.
-
-
Create the
Pipeline:$ oc create -f https://raw.githubusercontent.com/openshift/pipelines-tutorial/master/resources/petclinic-deploy-pipeline.yaml
-
Verify that the
Pipelinehas been added to the application as follows:$ tkn pipeline ls NAME AGE LAST RUN STARTED DURATION STATUS deploy-pipeline 8 seconds ago --- --- --- ---
Triggering and running a pipeline
A PipelineRun starts a Pipeline and ties it to the Git and image resources that should be used for the specific invocation.
Procedure
-
Start the
Pipelineas follows:$ tkn pipeline start petclinic-deploy-pipeline \ -r app-git=petclinic-git \ -r app-image=petclinic-image \ -s pipeline Pipelinerun started: petclinic-deploy-pipeline-run-q62p8-
The
-rflag specifies thePipelineResources that should be provided to the pipeline -
The
-sflag specifies the service account to be used for running the pipelineStarting a pipeline instantiates the
PipelineRunand creates a number of pods to execute the tasks that are defined in the pipeline. ThePipelineRunautomatically creates and triggers theTaskRunsfor eachTaskin the pipeline.
-
-
After a few minutes, verify that the
Pipelineran successfully by listing all thePipelineRunsas follows:$ tkn pipeline list NAME AGE LAST RUN STARTED DURATION STATUS petclinic-deploy-pipeline 7 minutes ago petclinic-deploy-pipeline-run-tsv92 5 minutes ago 4 minutes Succeeded
Checking pipeline and application status
You can examine the logs for PipelineRuns to verify its status.
Procedure
-
Check the
PipelineRunlogs as it runs using thetkn pipeline logscommand, which interactively allows you to chose the required pipelinerun and inspect the logs:$ tkn pipeline logs -f ? Select pipeline : petclinic-deploy-pipeline ? Select pipelinerun : petclinic-deploy-pipeline-run-tsv92 started 39 seconds ago ... [build : nop] Build successful [deploy : build-step-oc] deploymentconfig.apps.openshift.io/spring-petclinic rolled out [deploy : nop] Build successful
-
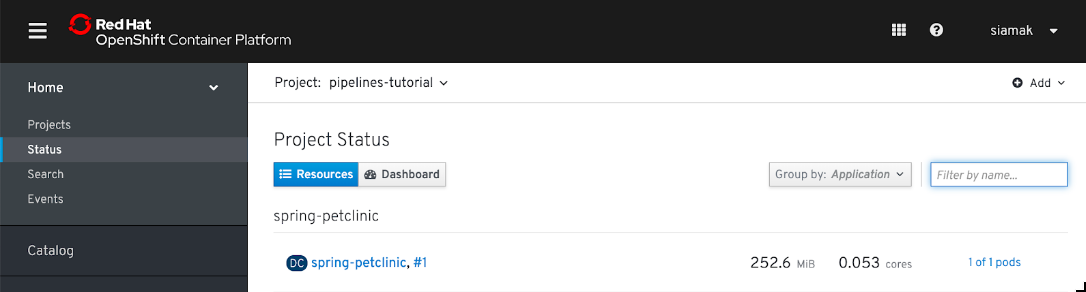
Check the Project Status in the OpenShift Web Console to verify that the PetClinic image is successfully built and deployed.
-
To rerun the last pipelinerun, using the same pipeline resources and service account used in the previous pipeline, use:
tkn pipeline start petclinic-deploy-pipeline --last
Working with Pipelines using the OpenShift Developer Perspective
After you create Pipelines using the tkn CLI or YAML files. You can visually interact with your deployed Pipelines on the Developer Perspective of the Openshift web console.
The Pipelines view in the Developer perspective lists all the pipelines in a project; the last run of the pipeline, it’s status, and the time taken for the run; and the status of the individual tasks in a pipeline run.
Prerequisites
To view your pipelines in the Pipelines view and interact with them, ensure that:
-
You have access to an OpenShift Cluster and have logged in to the web console and are in the Developer perspective.
-
You have cluster administrator privileges to install operators and have installed the OpenShift Pipelines Operator.
-
You have created a project, deployed an application, and created a pipeline for the application.
Procedure
To visually interact with the pipelines in your project:
-
In the Pipelines view of the Developer Perspective, select the project you created from the Project drop-down to see the pipelines listed in the Pipelines page.

-
Click on the required pipeline to see the Pipeline Details page. The pipelines Overview provides a visual representation of all the serial and parallel tasks in the pipeline.

-
Click:
-
Pipeline Runs tab to see the completed, running, or failed runs for the pipeline.
-
Parameters tab to see the parameters defined in the Pipeline and add or edit additional parameters as required.
-
Resources tab to see the resources defined in the Pipeline and add or edit additional resources as required.
-
-
Click Actions on the top-right corner and select Start to see the Start Pipeline dialog box. The resources populated in the Start Pipeline dialog box are based on the pipeline definition.
-
Use the drop-downs in the Start Pipeline dialog box to select or create the required resources to customize them as required, and click Start to start the pipeline run.
-
The Pipeline Run Details page displays the pipeline being executed. You can:
-
Hover over the tasks to see the time taken for each task execution.
-
Click on a task to see logs for that particular task.
-
Click the Logs tab to see the logs as per the execution sequence of the tasks.

-
-
Click Pipelines Runs in the breadcrumb trail displayed at the top-left corner to see a list of pipeline runs for the pipeline in the Pipeline Runs page.
-
Use the filters to see the complete, running, or failed pipeline runs.
-
Use the Options menu adjacent to a pipeline run to stop a running pipeline, rerun a pipeline using the same parameters and resources as that of the previous pipeline execution, or delete a pipeline run.
-